Roasted Garlic-Harissa Yogurt Dip!

roasted garlic harissa yogurt dip

Harissa is a blend of hot chile peppers, garlic, olive oil and spices and commonly used as a flavor base for curries and stews, as well as a condiment in the Middle East. Use it to add some spice in place of your regular hot sauce. The heat of the harissa, creaminess of the yogurt, sweetness of the roasted garlic, and acidity of the lime juice perfectly balance each other. This is versatile and works well as a dip or sauce with crudite, roasted veggies, and chicken.

Ingredients:
1 bulb roasted garlic, peeled and mashed
1 tablespoon harissa
2 cups plain full fat greek yogurt
juice from ½ lime
salt
mint leaves, garnish

Procedure:
1. In a food processor, add roasted garlic, harissa, and greek yogurt. Pulse until smooth.
2. Stir in lime juice and season with salt to taste.
3. Garnish with mint leaves
4. Enjoy!

Shiitake-Ginger-Miso Soup!

shiitake-ginger-miso soup

I made this soup today in an attempt to beat the sniffles, but even if you’re not fighting a cold, it’s really delicious and soothing. If you prefer not to eat the ginger, you can peel and leave in large chunks so that they can easily be removed later. Boost your immune system with the help of shiitakes, garlic, and ginger in addition to the healing powers of miso. Add some leafy greens to the pot before serving for extra vitamins!

Ingredients:
1 tablespoon avocado oil or olive oil
2-3 inch piece of ginger, peeled and finely chopped
1 onion, diced
1 head of garlic, peeled and minced
3 carrots, diced
10-12 fresh shiitake mushrooms, sliced
¼ cup white miso paste
1 head of roasted garlic, peeled and mashed
Directions:
1. In a large dutch oven, heat oil over medium heat and saute ginger and onion until onion is translucent.
2. Add raw garlic and carrots; saute for a minute before adding 1.5 quarts of water.
3. Bring to a boil, add mushrooms, and lower heat, cover, and simmer for 20 minutes.
4. Remove pot from heat and add miso paste, making sure all of the miso is dissolved.
5. Add roasted garlic paste and stir well.

Gochujang-Red Lentil Hummus!

red lentil hummus

This week, I’ll be traveling to LA to visit some friends, so snacks for the plane ride are on my mind this weekend. Often, the airports don’t have great healthy food options or they’re pricey, so I like to pack my own if I can. Along with dark chocolate-covered espresso beans and pistachios, I will be munching on crudite with this hummus. It was my first time making hummus with red lentils, which are great because they cook up so quickly and don’t require soaking. Although I used gochujang, a staple Korean fermented red chili paste, harissa or sriracha would also work very well. This would be a perfect, vegan option to have at the Super Bowl table too!
½ cup red lentils, rinsed and picked through for stones
1 teaspoon gochujang
1 clove garlic, peeled
2 tablespoons avocado oil or olive oil
juice of ½ a lemon
salt, to taste
chives, garnish

1.Place the lentils and and 1 cup of water into a small saucepan. Place over a medium heat and bring to the boil. Turn down to a simmer and cook, stirring often, until all the water is absorbed, about 10-12 minutes. The lentils should be mushy and thick.
2. Pulse the garlic in the bowl of the food processor and then add all the other ingredients. Blend until completely smooth.
3. Enjoy!

Burdock Kimpura!

kimpura

I had never heard of burdock root before the macrobiotics class at Natural Gourmet Institute. Our chef instructor said that in culinary school, he was reprimanded for peeling it, so I always remember to leave the skin on. It looks like it should be peeled with some dirt embedded in the skin, so I usually gently use a vegetable scrub brush to get any excess dirt off. The antioxidants and flavor are concentrated near the surface, so you want to make sure you preserve the skin. The root has a unique, sweet flavor that’s complemented by the savory sesame oil and shoyu. It is believed to serve as a blood purifier and strengthen the intestines. And it’s delicious!

2 tablepoons sesame oil
burdock root (about half pound), matchstick cut
medium onion, saute slice
2 carrots, matchstick cut
2-3 tablespoons shoyu or soy sauce

1. Heat a heavy skillet and coat with sesame oil.
2. Add burdock matchsticks and saute over medium heat until they no longer release their strong aroma. Stir constantly to coat the slivers evenly with oil and prevent burning.
3. Add thinly sliced onions, then the carrot matchsticks, mixing ingredients together. Saute for 1-2 minutes, and then add enough water to cover the bottom of the pan.
4. Cover pan and reduce heat, allowing to simmer for 25-30 minutes, or until the vegetables are tender, making sure the bottom of the pan does not get dry. Uncover and add shoyu or soy sauce to taste and simmer until most of the liquid is cooked out.

Jicama Nori Rolls!

nori roll

Over the summer, my friend Lucy and I fell in love with this recipe that we learned through Matthew Kenney’s raw food program. Jicama is a starchy, root vegetable that is really crunchy, like water chestnuts and a good source of vitamin C. It’s refreshing and much lighter than rice in a normal handroll. This can be enjoyed as a sushi roll as well.

For Jicama Rice:
4 cups jicama, peeled, roughly chopped
1 teaspoon sea salt
2 teaspoons rice wine vinegar
2 teaspoons honey (non-vegan) or agave (vegan)

nori sheets
leafy greens
julienne carrot
julienne beet
sunflower sprouts

1. Put jicama in food processor and pulse until there are small pieces about
the size of rice. Using a nut milk bag or mesh strainer, strain out excess
water. Toss with remaining ingredients in a bowl.
Optional: Place sushi rice on non-stick sheets and dehydrate until slightly
sticky, about 2-3 hours.

2. Cut nori sheet in half. Place flat on dry cutting board with long side facing you, shiny side down.
3. Layer leafy greens in bottom left corner. This helps keep the moisture from the jicama from making the nori sheet soggy.
4. Then spoon about a tablespoon of the jicama rice on top of the greens, flattening it out.
5. Layer the julienned vegetables and sunflower sprouts on top..
6. From the bottom left corner, carefully fold at a 45 degree angle up to meet the top of the nori sheet, forming a point at the bottom of the roll. From here, just roll towards the right side and seal with water.
7. Enjoy immediately.

Chocolate Chip Gingerbread Cookies with Vanilla Bean Glaze!

chocolate chip gingerbread cookies

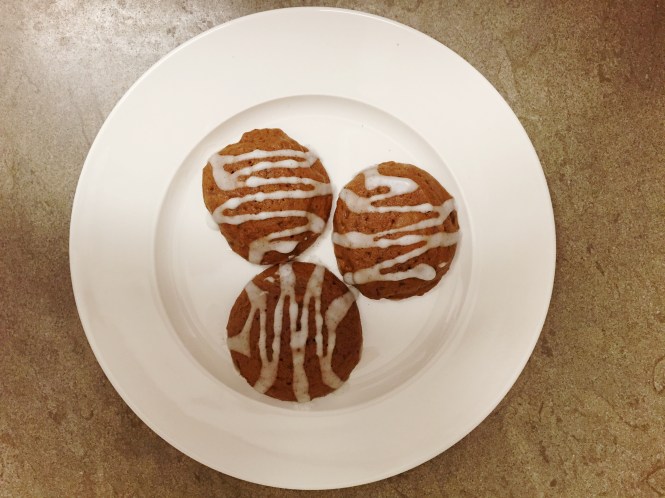
Gingerbread cookies scream Christmas to me, but I’m not a fan of rolling out cookie dough and cutting out gingerbread men, although I love to eat them 🙂 This is a simple, drop cookie recipe that is enhanced with orange zest and topped with a vanilla bean glaze. Molasses gives gingerbread its distinct flavor and unlike white sugar, it provides some nutritional value in the form of essential minerals and trace amounts of vitamins. Using a mini ice cream scoop, these come out uniform and puff up into perfect rounds. Spread the holiday cheer!

Ingredients

Cookies:
2 cups plus 2 tablespoons all-purpose flour
1 teaspoon ground cinnamon
1/2 teaspoon baking soda
1/2 teaspoon sea salt
1/4 teaspoon ground allspice
1/8 teaspoon ground ginger
8 tablespoons (1 stick) unsalted butter, at room temperature
1/2 cup packed dark brown sugar
1/2 cup unsulfured molasses
1 teaspoon pure vanilla extract
2 large eggs
Zest of 1 cara cara or navel orange
1/2 cup dark chocolate chips

Glaze:
2 cups confectioners’ sugar
2 large egg whites
1 vanilla bean, split and seeds scraped out

(Special equipment: a piping bag or squeeze bottle)

Procedure:

1. Whisk together the flour, cinnamon, baking soda, salt, allspice and ginger in a medium bowl and set aside.

2. Beat the butter, brown sugar and molasses together in a stand mixer fitted with a paddle attachment until light and fluffy, about 2 minutes. Beat in the vanilla, eggs and orange zest. Scrape down the sides of the bowl and mix until incorporated. Add the spiced flour mixture and beat until the dough just comes together. Fold in the chocolate chips. Scoop the dough into 1-inch balls and refrigerate on baking sheets, lined with parchment paper, until firm, about 1 hour.

3. Meanwhile, adjust the oven racks to the top and lower third of the oven and preheat to 325 degrees F.

4. Bake until the tops of the cookies are no longer glossy and the edges are firm, 12 to 14 minutes. Let cool on the baking sheets for a few minutes and then transfer to a rack to cool completely.

5. While the cookies cool, mix the confectioners’ sugar, egg whites and vanilla seeds in a stand mixer fitted with a paddle attachment until smooth and shiny.

6. Transfer the glaze to a piping bag or squeeze bottle and pipe stripes onto the cooled cookies. Store at room temperature in an airtight container for up to 3 days.

*Adapted from Geoffrey Zakarian’s Hermit Cookies

Cranberry-Pistachio Biscotti!

cranberry-pistachio biscotti

Every year around the holidays, I break out this recipe, which is a favorite of family and friends. I first learned this recipe when I assisted with culinary classes in The New School Culinary Arts program, which were held at The Inn on 23rd St. Grand Marnier enhances the rich dough with an orange essence, which complements the almond extract. The pistachios and cranberries are not just festive, but are full of antioxidants, evident from their bright colors. Hope you’ll enjoy these and share with loved ones over the holidays!

4 ounces (1 stick) butter, melted and cooled
1 cup sugar
2 ounces Grand Marnier
½ teaspoon salt
1 teaspoon almond extract
1 teaspoon vanilla extract
3 eggs
2 ¾ cups all-purpose flour
2 teaspoons baking powder
2 cups shelled pistachios
1 cup dried cranberries

Procedure:
1. In a medium bowl, sift together the flour and baking powder. Set aside.
2. In a large bowl, cream the butter and sugar together. Add Grand Marnier, salt, extracts, and eggs, one at a time. Beat until smooth.
3. Add the flour mixture, a third at a time, folding it into the wet ingredients.
4. Fold in the pistachios and cranberries until combined. Cover bowl and chill in refrigerator for about 1 ½ hours.
5. Preheat the oven to 350 degrees F. Line a large sheet pan with parchment paper. Form the dough into 2 slightly flattened logs, about 2-3 inches wide. Use the parchment paper to help form the logs, since the dough will be pretty sticky.
6. Bake in the oven for about 30- 35 minutes, until they are golden. Remove from the oven and slide the parchment onto a wire rack to cool.
7. Once the logs are cool, slice them crosswise about ¾ inches thick. Bake again at 350 degrees F for about 15-20 minutes, flipping over once.
8. Cool completely and store in an airtight container.

Crispy Baked Tofu with Cilantro Pesto!

baked tofu with cilantro pesto

I’ve never prepared tofu in this manner before, but it was well worth all of the steps to get perfectly crispy tofu (minus the deep fryer and greasiness). The sifting of arrowroot powder before placing the tofu cubes into the oven helps to make them extra crispy and get a nice golden brown. Toasting the pine nuts for the pesto helps bring out more of the nutty flavor and the addition of lemon zest really brightens it. Enjoy!

Tofu:
12 ounce package extra-firm tofu
2 tablepoons avocado or olive oil
2 tablespoons orange juice
1 teaspoon tamari or soy sauce
2 tablespoons water
1 garlic clove, minced
½ teaspoon red pepper flakes
½ teaspoon sea salt

1/2 tablespoon arrowroot powder or 1 tablespoon tapioca flour

Pesto:
1 bunch cilantro, stemmed
1 garlic clove
1 teaspoon lemon zest

1 teaspoon lemon juice

2 tablespoons pine nuts, toasted

avocado oil
sea salt

Procedure:
1. Drain the packing water from the tofu package. Then drain the tofu by itself, placing it on a layer paper towels or on a clean, dry kitchen towel for 10 minutes.
2. Wrap the tofu in a paper towel and set it on a large plate. Then place another large plates on top of the tofu and place a heavy can of beans or tomatoes on top. Let stand for 30 minutes.
3. Unwrap the pressed tofu, wipe it dry with paper towels, and cut into 1-inch cubes.
4. In a small bowl, whisk together oil, juice, tamari, water, garlic, red pepper flakes, and salt.
5. Place tofu cubes into a shallow pan that just fits all of them and pour over the marinade.
6. Refrigerate for 4 to 8 hours, flipping tofu at least once.
7. For the pesto, add cilantro leaves, garlic, lemon zest, lemon juice, and pine nuts to the food processor. Pulse to combine and drizzle in as much avocado oil that is necessary to loosen mixture. Add sea salt to taste. Refrigerate until tofu is ready.
8. Preheat oven to 350 degrees F. Line a baking sheet with parchment paper.
9. Drain the tofu, getting rid of garlic pieces clinging to tofu, as they will burn in the oven. Place the tofu cubes in a large bowl and sift the arrowroot powder or tapioca flour over the pieces while moving the tofu around in the bowl for even distribution.
10. Place the tofu cubes in rows on the parchment paper and baking, turning the cubes 90 degrees every 15 minutes, until they are crisp and browned, about 45 minutes.
11. Toss the baked tofu with cilantro pesto and serve immediately.

Red Lentil Coconut Curry!

red lentil curry

One of my favorite entrees to order in a Thai restaurant is the red curry. I love how the heat is balanced with the creaminess of the coconut milk. The light coconut milk adds richness without the heaviness that often leaves you feeling sluggish after eating. The red lentils help make it more satisfying, as well as thicken the curry. This would be great with any veggies, especially kabocha squash or Japanese eggplant. Hope you’ll enjoy this comforting dish!

Red Lentil-Coconut Curry

2 tablespoons butter or coconut oil
1 large yellow onion, diced
3 cloves garlic, minced
1 teaspoon minced ginger
1 cup red lentils
1 tablespoon red curry paste
1 tablespoon tomato paste
1 tablespoon curry powder
1 teaspoon coriander
1 teaspoon turmeric
1/2 teaspoon cayenne powder
3 1/2 cups vegetable broth
2 cups baby spinach leaves, tightly packed
1 (13.5-ounce) can light coconut milk
cilantro, to garnish

1. Heat the butter or coconut oil in a dutch oven over medium-high heat. Add the diced onion and cook until lightly golden and soft. Add in the minced garlic and ginger, and sauté for another 2 to 3 minutes. Add in the red lentils, red curry paste, tomato paste, and spices, and cook until fragrant. Pour in the broth and bring to a boil.

2. Once the lentils and broth reach a boil, reduce to a simmer, cover, and cook for 15 minutes, or until the lentils are soft. Before serving, fold in the fresh spinach leaves, and pour in the coconut milk.
3. Serve immediately. Enjoy!

Haricot Vert Almondine!

green beans

Happy Thanksgiving! Hope everyone is enjoying the holiday, surrounded with loved ones. I’m very thankful to have my family to come home to and cook with during the holidays. It’s really fulfilling to see everyone enjoy all of the yummy food.

Green bean casserole was never a tradition in our household, but I’ve always loved crunchy haricot vert. They are rich in Vitamins C and K, folate, potassium, and manganese. I learned this simple, delicious dish when I took a course at the French Culinary Institute several years ago. Normally, I don’t use salted butter, but my Mom bought this by accident and it actually worked well here. Of course, you can use unsalted butter and then adjust the salt level. The haricot vert are so beautifully glazed and the chopped nuts add a nice crunch. We’ll probably be making this again for Christmas! 🙂

Ingredients:
1 pound haricot vert
2 ounces amaretto
freshly ground black pepper
2 tablespoons salted sweet butter
2 tablespoons hazelnuts, toasted, peeled, and chopped or sliced almonds, toasted

Procedure:
1. Bring a large pot of water to a boil. While the water is boiling, prepare an ice bath.
2. Add haricot vert to boiling water and cook for about one minute. Drain and add to ice bath.
3. Bring amaretto to a boil and season with pepper.
4. Add salted butter and cook until thoroughly combined.
5. Add blanched green beans until coated with sauce and just heated through.
6. Top with toasted nuts and serve immediately. Enjoy!

Butternut Squash-Red Lentil Soup!

butternut squash-lentil soup2

For a long time, I only bought pre-cut butternut squash due cutting my finger while using a knife to remove the peel off over Thanksgiving one year. Since then, I’ve learned that you can actually use a peeler to get the skin off more easily and safely, as long as it is not a dull peeler. The best way to do this is to cut off the ends, cut the squash in half cross-wise, and then use the peeler on each of the sections. My favorite peeler is the Kuhn Rikon Original Swiss Peeler, which we were given in culinary school, and retails for under $3 each on Amazon. It’s sharp, lightweight, and comes in a variety of bright colors. Dicing this squash brought me back to my culinary internship when I had to dice 12 quarts of butternut squash every Friday for the restaurant’s popular weekend brunch hash. Thankfully, this recipe only requires dicing one squash, so you won’t be left with orange, sticky hands 🙂

The addition of red lentils adds protein as well as thickens the soup. Red lentils have a really beautiful, coral color, before turning yellow when cooked. They are also really thin compared to other lentils, so they break down and cook quicker than other lentils. When the soup is pureed in the Vitamix, the result is really silky and delicious, with a hint of spice.

Ingredients:
2 tablespoons avocado oil
1 medium onion, minced
2 garlic cloves, minced
1 tablespoon plus 1 teaspoon minced fresh ginger
1 teaspoon brown mustard seeds
1 teaspoon cumin seeds
1/2 teaspoon turmeric
1 medium butternut squash (about 1 1/2 pounds), peeled, seeded and diced (about 3.5 cups diced squash)
1 cup red lentils, rinsed
1 ½ quarts of vegetable stock
Salt
Black pepper

Procedure:
1. Heat oil over medium heat in large, heavy soup pot. Add onion and cook, stirring often, until tender, about 5 minutes.
2. Add garlic, ginger, 1 teaspoon mustard seeds and 1 teaspoon cumin seeds and cook, stirring, until fragrant, 30 seconds to a minute.
3. Stir in turmeric, squash, red lentils and vegetable stock. Turn up heat, add salt to taste and bring to a boil.Reduce heat to low, cover and simmer 35 to 45 minutes, until squash and lentils are tender. Taste and adjust salt.
4. Purée soup using an immersion blender or, working in batches, in a blender (pull a towel down over the top of blender to avoid hot splashes). Return to pot if using blender. Add black pepper, taste and adjust salt, and heat through.

Chickpea-Tuna Salad!

chickpea-tuna salad

I’ve been enjoying this chickpea-tuna salad as part of the salads that I bring to work this week. I love the addition of pickles and rosemary in here and it would be just as delicious if you substituted in capers and minced parsley. Tuna is a perfect lean protein to always keep stocked in your pantry. Not only is it rich in omega 3s, but it is also a good source of niacin, a B vitamin that is believed to maintain HDL (good cholesterol) levels. Hope you’ll enjoy it!

Ingredients:
2 tablespoons lemon juice (about 1 lemon)
1 tablespoon pickle juice
zest of lemon
3 tablespoons olive oil
1 teaspoon dijon mustard
1/2 teaspoon sea salt

1 cup dried chickpeas, soaked overnight and cooked, or a 15.5 ounce can of chickpeas
7 ounce can of tuna, drained and flaked
1 orange or red bell pepper, finely diced
1 cup finely chopped red onion (about 1 small red onion)
½ cup finely chopped pickles
1 teaspoon finely chopped fresh rosemary

Procedure:
1. In a large bowl, whisk together lemon juice, lemon zest, olive oil, dijon mustard, and sea salt.
2. Add remaining ingredients, ensuring dressing is evenly distributed.
3. Enjoy!

Pumpkin Mac and “Cheese”!

pumpkin mac and cheese

At this time of year, I find myself wanting everything pumpkin. Pumpkin beer, pumpkin ice cream, pumpkin pie…and the list goes on. Since I’m beginning to carbo-load for the NYC marathon this weekend, I wanted to make a pumpkin sauce for my pasta. I adapted this recipe from the Oh She Glows website and was so excited to try it out after yoga tonight. With nutritional yeast, I’m always skeptical on how it will taste, but somehow it really does add a slightly cheesy taste to the sauce, which has the ideal consistency from the arrowroot powder. The pumpkin puree is a good source of magnesium and potassium, as well as Vitamins A and K. This recipe cooks very quickly and will get dinner on the table within 30 minutes! I really enjoyed it and hope you will too 🙂

8 ounce box of pasta
1 tablespoon Earth Balance (or other non-dairy butter replacer)
3/4 cup vegetable broth
1 tablespoon arrowroot powder or cornstarch or flour
1/4 teaspoon garlic powder
6 tablespoons nutritional yeast
2 teaspoons Dijon mustard
1 cup canned pumpkin
1/2 teaspoon sea salt
freshly ground black pepper

1. Bring a large pot of salted water to a boil. Cook pasta, according to directions.

2. While pasta is cooking, add Earth balance in a pot over low-medium heat.

3. In a small bowl, whisk together broth and arrowroot powder and garlic powder until clumps are gone. Add into pot and whisk.

4. Whisk in nutritional yeast, mustard, salt, and pepper over low heat until thickened (about 5-7 minutes or so). Lastly, add in 1 cup of canned pumpkin and stir until combined and heated through.

5. Add sauce to cooked pasta and mix until pasta is evenly coated.

6. Leftovers can be stored in an air-tight container in the fridge for up to 7 days.

Creamy Carrot-Ginger Soup!

carrot-ginger soup

The other night, I was on my way home from a volunteer event and was hungry, but didn’t have the energy to cook anything. I stopped by my local supermarket and picked up a carton of organic cashew carrot-ginger soup which was delicious. However, I was appalled by the fact that the third ingredient was cane sugar! After that, I was determined to make my own healthier version. This uses Japanese sweet potato to both add sweetness and creaminess to the soup. Trader Joe’s recently started stocking them 🙂 I love the kick of the ginger that offsets the sweetness of the carrots and sweet potato. This soup is a good source of Vitamin A, especially from the carrots, and ginger is warming to the body, perfect for this chilly weekend! Hope you’ll cozy up to a bowl soon!

Serves 4

4 ½ cups low-sodium vegetable broth, divided
1 yellow onion, diced
3 cloves garlic, minced
1 tablespoons minced ginger
1 pound carrots, coarsely chopped
1 medium Japanese sweet potato or regular sweet potato, peeled and cut into 1-inch chunks
1 tablespoon sliced fresh chives

1. Heat 1/2 cup broth to a simmer in a medium saucepan over medium-high heat. Add onion and garlic and cook until tender, about 6 minutes, stirring occasionally.

2. Stir in ginger, carrots, sweet potato, and remaining broth and heat to a boil. Reduce to a simmer, cover and cook 25 minutes or until vegetables are tender.

3. In batches, carefully puree in a blender. Add water or broth if needed to thin to desired consistency. Reheat soup if necessary. Garnish with chives.

Zucchini, Almond, & Mint Soup!

zucchini almond mint soup

I think I’m in denial that we are fully into autumn and am clinging to the tastes of summer, before we’re hit with winter weather. This is perfect for those of you cleaning out your garden of the last zucchini and mint. The almonds provide creaminess to the soup, while keeping it vegan and light. Zucchini is a good source of Vitamins A and C, as well as potassium. Most of the nutrients are found in the skin, so if you can, buy organic and don’t peel it. The skin also lends a beautiful hint of green to the soup. I added beluga lentils on top in order to give it some heartiness as well as texture. Enjoy!

2 tablespoons extra-virgin olive oil
4 cloves garlic, minced
1 sweet onion, small dice
6 cups chopped zucchini (about 2-3 medium zucchini, unpeeled)
1 1/2 cups slivered almonds
5 cups vegetable stock
1 cup fresh mint
Salt and pepper, taste

1.Heat olive oil in a large pot, then add garlic and onion and sauté over low heat until soft and fragrant, stirring often. Add in chopped zucchini and almonds, and cook everything together for about 5 minutes.
2. Then cover with stock and bring to a boil. Reduce heat and simmer until zucchini is soft and tender, about 15 to 20 minutes. Let cool before blending.
3. Add fresh mint to the soup and blend in a high speed blender until smooth. Season to taste.
4. Serve the soup, hot or cold.

Garlic-Miso Soup!

garlic-miso soup

Happy First Day of Fall! With the change in weather, it seems that colds have been spreading quickly at the office. Every time I heard coughing and sneezing in the office today, I cringed, hoping I wouldn’t be the next one. On my way home from work, I stopped at the market for a head of garlic to make this soup. I learned the recipe in my Kitchen Pharmacy class in culinary school. It’s super simple and delicious! I would enjoy it even if I weren’t looking to boost my immunity. A single clove of garlic has 5 mg of calcium, 12 mg of potassium, and greater than 100 sulfuric compounds to kill bacteria and infection. Miso is a great concentrated source of plant protein, antioxidants, protective fatty acids, and live probiotics. Hope this soup will serve you well!

INGREDIENTS

1 head of garlic, peeled
1 quart vegetable stock or unsalted broth
1 1⁄2 tablespoons white miso
PROCEDURE
1. In medium pot, simmer garlic cloves in stock or broth for 15 minutes, partially covered.
2. Remove from heat. Puree garlic cloves in blender with about 1 cup of cooking liquid and the miso. Pour back into soup pot and stir.
3. Serve immediately. Enjoy!

Sprouted Buckwheat Granola!

raw granola

Buckwheat is not related to wheat at all, which makes it gluten-free. It is actually a fruit seed and is believed to be easier to digest than grains. The purpose in soaking and sprouting the buckwheat is to neutralize enzyme inhibitors that prevent absorption of nutrients. If you don’t want to sprout and dehydrate buckwheat, you can always buy it already sprouted or even substitute in sprouted quinoa or millet. I really love this recipe because it uses date paste, a whole food, rather than a highly processed sweetener like white sugar or agave nectar. You can feel good about sharing this granola with loved ones.

Sprouted Buckwheat Granola

1 ½ cups sprouted, dehydrated buckwheat*
1 pear, diced and roughly chopped
¼ cup pumpkin seeds
¼ cup sunflower seeds
½ cup raisins or other dried fruit, soaked for 30 minutes and roughly chopped
¾ cup date paste**
2 tablespoons lemon juice
1 teaspoon lemon zest
1 teaspoon vanilla extract
½ teaspoon cinnamon
pinch ground clove
pinch salt

1. Mix all ingredients by hand in a large bowl, until well combined.
2. Spread onto a dehydrator sheet in ½ inch thick layer, allowing some space between granola pieces.
3. Dehydrate at 115 degrees F for 18-24 hours or until dry.
4. Enjoy!
*Sprouting Buckwheat:
1. Rinse buckwheat several times until water becomes clear
2. Soak in slightly warm water for 20 minutes, to begin sprouting process
3. Transfer to mesh strainer and rinse well again
4. Place strainer over a bowl and cover with a kitchen towel
5. Leave on counter to sprout (1-2 days), rinsing every 8-12 hours.
6. When the buckwheat is sprouted, it should have a tail no longer than the buckwheat groat itself.
7. Rince and spread out the sprouted buckwheat on a mesh dehydrator screen, being careful not to overcrowd the groats.
8. Dehydrate at 115 degrees F until completely dry.

**Date Paste: Process 5-8 soft dates with ¼ – ½ cups of water until a paste is formed.

Sesame-Ginger Kelp Noodles!

kelp noodles_blog

Kelp noodles are made out of the seaweed kelp and are fat-free, gluten-free, and very low in carbs, which makes them perfect for people with different dietary requirements.They are rich in a number of nutrients, mainly calcium, iron, and vitamin K. However, they are naturally high in sodium, so be mindful if you need to watch your sodium intake. They are a healthy and delicious alternative to conventional pasta and noodles and actually remind me of vermicelli or glass noodles, common in asian cooking. The sesame-ginger sauce coats the noodles nicely and the addition of a rainbow of thinly sliced veggies makes it really appealing and yummy. They also hold up well in soup and do not require cooking. Hope you enjoy them as much as I do!

Sesame-Ginger Kelp Noodles

12 ounces kelp noodles
juice of half a lime
1/3 cup tahini
1 tablespoon rice vinegar
1 tablespoon ume plum vinegar
1 tablespoon finely grated fresh ginger or 1 teaspoon of ground ginger
1 tablespoon white miso
1 teaspoon tamari
1 teaspoon sesame oil
pinch red pepper flakes
¼ cup water
¼ cup shredded red cabbage
¼ cup thinly sliced green beans
1 carrot, julienned
2 tablespoons chopped cilantro
2 tablespoons thinly sliced scallion
2 tablespoons sesame seeds (preferably black)
1. Soak kelp noodles in a large bowl of warm water with lime juice for 30 minutes
2. Rinse noodles thoroughly, then drain and transfer to a dry bowl
3. In a small bowl, whisk together the tahini, rice vinegar, ume plum vinegar, ginger, miso, tamari, sesame oil, and red pepper flakes. Once blended, whisk in water until you reach your desired consistency.
4. Toss the kelp noodles in the sesame-ginger sauce (depending on how saucy you like your noodles, you may have some sauce left over). Toss in the cabbage, green beans, and carrots. Garnish with cilantro, scallion, and sesame seeds. Serve immediately.

Heavenly Chocolate Ice Cream!

chocolate ice cream

When I made this ice cream for the first time, I couldn’t wait for it to freeze because it already tasted incredible out of the Vitamix. Vegans and non-vegans will absolutely fall in love with this rich, chocolatey ice cream. The cashews and coconut meat give it an ultra creamy texture that you won’t want to stop eating. You can find fresh young thai coconuts in Whole Foods or if you don’t want to crack open your own coconut, frozen coconut meat (popular brand: Exotic Superfoods) can be found in health food stores. However, the bonus of opening a fresh coconut is the refreshing coconut water!

Raw coconut is full of medium-chain triglycerides, a type of dietary fat that has been shown to curb hunger more effectively than other forms of fat and could improve cholesterol levels. It is also full of minerals and could help boost immunity. This would a be great to treat to consider for Labor Day weekend, whether or not you want to share 🙂 (An ice cream maker is not absolutely necessary, but it will deliver creamier results. The churning prevents tiny ice crystals from forming. I made this without one and it’s still delicious!)

1 cup cashews, soaked overnight
½ cup young coconut meat
½ cup honey (non-vegan) or agave (vegan)
1 ¼ cups coconut water
¼ cup coconut oil
1 tablespoon vanilla extract
4 tablespoons cacao powder
¼ teaspoon sea salt

1. Blend all ingredients in blender until very smooth.
2. Pour into ice cream machine and freeze according to manufacturer instructions.

Zucchini-Avocado Tartare!

tartare_blog

This month is super busy for me since I’m doing an online culinary program that is more intense than expected! But I will try to blog when I have free time 🙂 This is a recipe that I just learned and really love for its simplicity. You can easily impress guests with it! Because it’s raw, you’ll be absorbing more of the nutritional goodness. Lemon juice and olive oil help to make the zucchini nice and tender. Also, this is done best with a ripe avocado that is not too soft. Enjoy!

1 small zucchini, small dice
½ tablespoon lemon juice
1 teaspoon olive oil
1/8 teaspoon agave
½ tablespoon chives, minced
½ teaspoon salt
½ avocado, small dice

1. Toss all ingredients until well combined, saving avocado for last so that it doesn’t get mushy.

2. Press into a ring mold (using a spoon) to serve. Garnish with
chive points, fresh ground pepper and a drizzle of olive oil.