Pear Clafoutis!

pear clafoutis 3-30-19

This week, I had too many ripe pears and decided to make a clafoutis, which I don’t think I have made in over ten years. Clafoutis are flan-like cakes, originating from France, and traditionally made with cherries. You can substitute the pears for pitted cherries (2 cups) and use almond extract, instead of vanilla extract. The result will be delicious and you’ll have trouble resisting seconds. It’s a nice, light dessert or snack 🙂

Ingredients:

3 large eggs
½ cup sugar
6 tablespoons unsalted butter, melted and cooled, plus more for baking dish
1 cup all-purpose flour
pinch of salt
1 cup whole milk
½ teaspoon vanilla extract
4 ripe pears, diced
powdered sugar (optional)

Procedure:
1. Preheat oven to 400 degrees F. Butter glass pie dish or 9” cake pan.
2. Beat sugar and eggs until light in color
3. Gradually add butter and mix until well-incorporated.
4. Add flour and salt; whisk until combined.
5. Slowly add milk, while mixing.
6. Add vanilla extract and mix well. Batter should appear smooth and shiny
7. Add pears to prepared baking dish and pour batter over the fruit.
8. Bake 25 to 30 minutes, until slightly browned and set.
9. Allow to cool for at least 15 minutes before slicing. Sprinkle with powdered sugar, if desired.


Banana Bread Mini-Muffins!

banana bread mini muffins 2-10-19

There was a lot of baking done this weekend and these mini muffins were a hit with baby and hubby. That’s a win in my book, especially because they are only sweetened with bananas 🙂 I also love that these are naturally gluten-free and require ingredients that we always have on hand. So simple and so good! Perfect for breakfast or a snack on the go.

Yield: about 24 mini-muffins

Ingredients:

1 egg
2 tablespoons butter, room temperature
2 medium size bananas, mashed
½ teaspoon vanilla
1 cup rolled oats
1 teaspoon baking powder
¼ teaspoon cinnamon
¼ teaspoon salt

Procedure:

1. Preheat oven to 375 degrees. Grease or line muffin tin pan.
2. In electric mixer, beat together egg and butter until smooth.
3. Add bananas and vanilla. Mix thoroughly.
4. In a separate bowl, combine oats, baking powder, cinnamon, and salt.
5. Add dry ingredients to wet ingredients and mix until combined.
6. Spoon into prepared mini muffin tin pan, about ¾ of the way up.
7. Bake about 15-20 minutes

Aji Verde (Peruvian Green Chili Sauce)

aji verde

Recently, I went to Sophie’s Cuban Cuisine near me and had completely forgotten how much I love their green sauce. The first time I made it, I used the food processor and didn’t really like the consistency of the sauce even though it tasted great. The Vitamix worked out better and was less cleaning, so win-win. You can use this sauce on just about anything, including meat, seafood, veggies, etc. It’s actually a nice salad dressing too!

Ingredients:

1 bunch cilantro, including stems
4 jalapenos, most seeds removed and roughly chopped
2 garlic cloves, peeled
¼ cup avocado or olive oil
1-2 tablespoons mayonnaise (optional)
Squeeze of lemon juice
½ teaspoon sea salt

1. Puree all ingredients in blender. Mayonnaise adds creaminess. If the sauce appears too thick, add water to thin it out. Refrigerate to allow flavors to meld together. It keeps fresh for about a week. Enjoy!

Wild Rice Salad!

wild rice salad

Wild rice isn’t actually rice, but the seed of a type of marsh grass. Similar to brown rice, it has a nutty flavor, but has more protein, fiber, iron and copper than brown rice. The addition of cucumber, radishes, and parsley to the wild rice lighten it up and make it a refreshing side dish. Enjoy!

Ingredients:

Salad:
1 cup wild rice
1 persian cucumber, chopped small
6 small radishes, julienned
½ cup currants
½ cup walnuts, chopped
½ bunch parsley, chopped
sea salt to taste

Dressing:
2 tablespoons brown rice vinegar
1 tablespoon fresh lime juice
1 teaspoon dijon vinegar
3 tablespoons olive oil
sea salt to taste

Procedure:

1. Cook wild rice according to directions and allow to cool.
2. In a large bowl, whisk together dressing ingredients.
3. Add salad ingredients to dressing and mix until evenly distributed.

Strawberry-Rhubarb Crisp!

strawberry-rhubarb crisp

Rhubarb is now in season and I picked up a few stalks at the coop the other day. It kind of looks like celery but the stalks tend to be thicker and bright pink in color. Since it’s pretty tart, it’s usually baked as a sweet and most popularly paired with strawberries. This crisp is really the perfect balance of sweet and tart, with a 1:1 ratio of filling to topping. It makes for a quick and easy dessert! No need to mess with pie dough here. Enjoy!

Ingredients:

Fruit filling:
8 ounces strawberries, hulled and halved (quartered if large)
8 ounces rhubarb, trimmed, roughly cut into ½ inch dice
½ cup raw (turbinado) sugar
1 tablespoon arrowroot powder or cornstarch
¼ teaspoon sea salt

Topping:
1 cup rolled oats
¼ cup all-purpose flour
¼ cup unsalted butter (½ stick), melted
1/8 teaspoon sea salt

Procedure:
1. Preheat oven to 375 degrees.
2. In a large bowl, combine strawberries, rhubarb, raw sugar, arrowroot powder or cornstarch, and sea salt. Transfer to an 8-inch square baking dish.
3. In a medium bowl, combine oats, flour, butter, brown sugar, and salt. Stir until combined and slightly clumpy. Spread evenly over fruit.
4. Bake until juices are bubbling in the center and topping is golden brown, about 45 minutes. Let cool slightly before serving.

Adapted from Martha Stewart’s Strawberry-Rhubarb Crisp recipe

Lemon-Ricotta Muffins!

lemon-ricotta muffins

With leftover fresh ricotta from my pasta recipe earlier this week, I decided to try baking these lemon-ricotta muffins. The turbinado sugar on top forms a nice crunch for contrast. The lemon zest and lemon juice make them perfectly lemony, while the ricotta keeps these muffins nice and moist. Enjoy!

Ingredients:
1 ¾ cups all-purpose flour
¾ cup sugar
2 ½ teaspoons baking powder
¼ teaspoon sea salt
¾ cup whole milk ricotta cheese
½ cup water
¼ cup olive oil
1 tablespoon lemon zest
2 tablespoons fresh lemon juice
1 large egg, lightly beaten
2 tablespoons turbinado/raw sugar

Procedure:

1. Preheat oven to 375 degrees. Place 12 muffin-cup liners in muffin cups.
2. Combine flour, sugar, baking powder, and sea salt in a medium bowl.
3. In another medium bowl, combine the ricotta, water, olive oil, lemon zest, lemon juice, and egg.
4. Make a well in the flour mixture and add ricotta mixture, stirring just until moist.
5. Divide batter evenly among muffin cups and sprinkle each with turbinado sugar.
6. Bake for 16 minutes or until a toothpick inserted in the center comes out clean. Cool 5 minutes in pan on a wire rack.

Adapted from Cooking Light‘s Tuscan Lemon Muffins recipe

Spring Pesto Pasta!

pesto pasta

Happy first week of Spring! After a chilly day yesterday, it seems that warmer weather is really on its way and here to stay, as March wraps up. This pesto incorporates some spring peas and lots of fresh basil, which is so refreshing. I also added some blanched spiralized zucchini on top. If you’re looking to cut back on carbs, you could sub in more spiralized zucchini in place of the pasta for a lighter dish. My husband, who said he normally isn’t a fan of pesto, really loved this and couldn’t stop eating it. Radiatore and fusilli are ideal pasta shapes for the pesto, with so many nooks for the pesto to cling to. Enjoy!
Ingredients:
¼ cup fresh or frozen and thawed peas
2 cups packed basil
1/3 cup pine nuts
1 cup freshly grated Parmigiano-Reggiano
1 garlic clove, minced
1 teaspoon sea salt
¼ cup olive oil
1 cup fresh ricotta
½ lemon, zested and juiced
1 pound radiatore or fusilli pasta

Procedure:

1. Add peas, basil, pine nuts, Parmigiano-Reggiano, garlic, and sea salt to a food processor and pulse to combine. While processing, stream in the olive oil until smooth.
2. In a small bowl, stir together the ricotta, lemon juice, and half of the lemon zest.
3. Bring a large pot of water to a boil and add a tablespoon of salt. Cook pasta until al dente and drain, reserving a cup of the cooking water.
4. Add pesto to the large pot and if it’s too thick, add some pasta water to loosen it. Then add pasta and mix thoroughly until coated.
5. Serve warm with a dollop of the lemon ricotta on top and a sprinkle of the remaining lemon zest.

Savory Blue Corn Muffins!

blue corn muffins

One of the major benefits of living in New York City is the food and a restaurant I sorely miss is Bobby Flay’s Mesa Grill, which closed years ago due to a ridiculous rent hike. Somehow it came up in conversation with my parents not too long ago that we used to love going to Mesa Grill for brunch. Upon ordering, they would bring out the best bread basket, filled with a variety of delicious baked goods. There would always be a cinnamon sugar coffee cake, tiny chive biscuits, and blue corn muffins, served with a pepper jam. The blue corn muffins always stood out because of their unique appearance and taste; they were half yellow corn and half blue corn. This recipe is completely blue corn**, but in order to get that striking effect, you could simply do ¾ cup yellow corn and ¾ cup blue corn and halve the other ingredients to mix in two separate bowls. Then when baking, you simply fill the muffin cups with half of each. Either way, they’re delicious and perfect for your next brunch gathering. Enjoy!

Yield: 12 regular muffins

Ingredients:
4 ounces (1 stick) unsalted butter
1/3 cup finely diced onion
2 cloves of garlic, finely chopped
1 cup milk
4 large eggs
1/2 cup finely diced red bell pepper
2 jalapeno peppers, finely diced
1/2 cup fresh or frozen corn, thawed
2 tablespoons finely chopped cilantro leaves (optional)
1 1/2 cups blue cornmeal (can substitute yellow)
1 cup all-purpose flour
1 tablespoon baking powder
1/2 teaspoon baking soda
1 teaspoon salt
2 tablespoons sugar

Procedure:

1. Set a rack in the middle of the oven and preheat to 400 degrees F. Grease or line muffin pan.

2. In a small saucepan, melt the butter. Add the onions and garlic and cook until soft. Allow to cool.

3. In a large mixing bowl, whisk together the milk, eggs, bell pepper, jalapeno, corn and cilantro (if using). Whisk in the cooled butter mixture.

4. In a separate bowl, stir together the cornmeal, flour, baking powder, baking soda, salt and sugar. Mix into the liquid mixture.

5. Divide the batter evenly among the muffin slots and bake for 20 minutes or until set, turning the pan once for even baking. If making mini muffins, bake for 10 minutes or until set.

**Bob’s Red Mill has blue corn meal. This can usually be found at Whole Foods; otherwise a reasonable place to order online from is iHerb.com, which is where I bought mine.

Adapted from Bobby Flay’s Blue Corn Muffins recipe


Lemony Chickpea Salad!

chickpea-salad

We’ve been experiencing spring-like weather in NYC these days which puts me in a salad mood. This is a refreshing chickpea salad, using minimal ingredients and is great over crunchy chopped romaine or as a side dish or even as a topping on your avocado toast. To bulk it up for a more filling meal, you can add quinoa to the mix. Enjoy!

Ingredients:

1- 29 ounce can of chickpeas, drained and rinsed OR about 3 cups cooked chickpeas
10-12 black sicilian oil-cured olives, pitted and thinly sliced
1 lemon, zested and juiced
1 shallot, finely chopped
2 tablespoons of freshly chopped parsley
salt
pepper
olive oil

Procedure:

1. Mix the first 5 ingredients in a large bowl.
2. Lightly mash chickpeas with a fork, leaving most of the chickpeas whole.
3. Add salt, pepper, and olive oil to taste

Double Chocolate Banana Bread!

double-chocolate-banana-bread

My husband really enjoys banana bread and since tomorrow is Valentine’s Day, I decided to bake a double chocolate banana bread for him to bring to the office. This banana bread is basically a luscious chocolate cake that I would easily choose over a brownie and healthier! I’m not sure I can go back to regular banana bread now. This is really a treat!
Ingredients:

3 medium-to-large very ripe bananas (about 1 cup mashed banana)
1/2 cup butter, melted and cooled
3/4 cup brown sugar
1 large egg
1 teaspoon pure vanilla extract
1 teaspoon baking soda
1/4 teaspoon sea salt
1/2 teaspoon ground cinnamon
1 cup all-purpose flour
1/2 cup Dutch-process cocoa powder + more for dusting pan
1 cup semisweet or bittersweet chocolate chunks or chips
Procedure:

1. Heat your oven to 350°F. Butter and dust a 9×5-inch loaf pan with cocoa powder.

2. Mash bananas in the bottom of a large bowl. Whisk in melted butter, then brown sugar, egg, and vanilla. Sift baking soda, salt, cinnamon, flour and cocoa powder in a sifter or fine-mesh strainer and add to wet ingredients. Stir dry and wet ingredients with a spoon until just combined. Stir in chocolate chunks or chips.

3. Pour into prepared pan and bake 55 to 65 minutes, until a tester or toothpick inserted into the center of the cake comes out batter-free. Cool in pan for 15 minutes, then run a knife around the edge and invert it out onto a cooling rack. Serve warm or at room temperature.

Note: The banana bread will keep for up to 4 days at room temperature. Keep it wrapped in foil for freshness.

Adapted from Smitten Kitchen‘s recipe

Chinese Almond Cookies!

almond-cookies

Happy Chinese New Year! I wanted to make something special to share for the New Year and these are one of the traditional desserts. One of my friends in high school used to bake almond cookies for all different occasions. My Mom used to make a similar cookie during Christmas but she would top it with half a maraschino cherry. Brushing egg whites on the top before baking gives them a nice golden finish. Enjoy!

Yield: about 42 cookies

Ingredients:

1 cup butter, room temperature
1 cup sugar
1 egg
1 teaspoon almond extract
3 cups all-purpose flour
1 teaspoon baking soda
1/2 teaspoon sea salt
1/4 cup raw almonds
1 egg white
1/2 teaspoon water

Procedure:

1. In a large bowl, cream butter and sugar. Beat in egg and extract. Combine the flour, baking soda and salt; gradually add to creamed mixture.
2. Roll into 1-in. balls. Place 2 inches apart on ungreased baking sheets. Flatten with a fork. Place almond in center of cookie.
3. In a small bowl, beat egg white and water. Brush over cookies.
4. Bake at 325° for 14-16 minutes or until edges and bottoms are lightly browned. Cool for 2 minutes before removing from pans to wire racks.
Recipe adapted from Taste of Home

Butternut Squash Soup!

butternut-squash-soup

I made this soup as part of our Thanksgiving feast and wanted to share the very simple recipe. Although there are few ingredients, this soup is truly delicious and perfect for autumn!

Ingredients:
1 (2-3 pound) butternut squash, peeled, seeded, and diced into 1” chunks
2 tablespoons unsalted butter or olive oil
1 medium onion, diced
6 cups chicken stock or vegetable stock
pinch of nutmeg
salt and freshly ground pepper

Directions:
1. In a large pot, melt butter or add oil. Add onion and cook until translucent, about 8 minutes.
2. Add squash and stock.
3. Bring to a simmer and cook until squash is tender, about 15-20 minutes.
4. Remove squash chunks with slotted spoon and place in blender to puree.
5. Return blended squash to pot and stir.
6. Season with nutmeg, salt, and pepper.
7. Enjoy!


Double Chocolate Crinkles!

double-chocolate-crackles

I typically make these cookies around the holidays for friends and family, but I wanted to bake something special to bring into the office this week. These are pretty simple to make and don’t require any out of the ordinary ingredients, but the dough does need to chill before it is shaped to bake. This has been one of my favorite recipes and is perfect for anyone that loves chocolate 🙂
Ingredients:
2 cups (12oz bag) semi-sweet chocolate chips, divided
1 ½ cups all-purpose flour
1 ½ teaspoons baking powder
¼ teaspoon salt
1 cup granulated sugar
6 tablespoons butter, room temperature
1 ½ teaspoons vanilla extract
2 large eggs
½ cup powdered sugar

Procedure:
1. Microwave 1 cup of the chocolate chips in a bowl, uncovered for 1 minute and stir. Microwave at additional 10-15 second intervals, stirring just until morsels are melted. Let cool to room temperature.
2. Sift flour, baking powder, and salt into a small bowl. Stir. Beat sugar, butter, and vanilla extract in large bowl. Beat in melted chocolate. Add eggs one at a time, beating well after each addition. Gradually beat in flour mixture. Then mix in the remaining chocolate chips. Cover; refrigerate just until firm.
3. Preheat oven to 350 degrees F. Line baking sheets with parchment paper.
4. Shape dough into 1 1/2-inch balls and roll in the powdered sugar. Place on prepared baking sheets.
5. Bake for about 15 minutes or until sides are set but centers are still slightly soft. Cool on baking sheets for 2 minutes and move to wire racks to cool completely.

Recipe is adapted from Nestle’s Firecracker Fudge Cookies.

Rice Pudding!

rice-pudding-10-11-16

Today, I was trying to think of what to do with my abundance of leftover rice, besides make fried rice. Somehow, I thought of rice pudding, which I’ve never made before. The recipe is really simple and produces a rich, creamy rice pudding! This was a touch sweet for me so next time I may try to cut back the sugar to ¼ of a cup instead of 1/3 of a cup. Nonetheless, it’s delicious!

Ingredients:

1 ½ cups cooked white rice
2 cups milk, divided
1/3 cup sugar
¼ teaspoon sea salt
1 egg, beaten
1 tablespoon butter
½ teaspoon vanilla extract
cinnamon

Procedure:
1. In a saucepan, combine rice, 1 ½ cups milk, sugar, and salt. Cook over medium heat until thick and creamy, about 15-20 minnutes. Stir in remaining ½ cup milk and beaten egg; cook for 2 minutes.
2. Remove from heat and stir in butter and vanilla.
3. Serve at preferred temperature (warm, room temperature, cold..). Sprinkle with cinnamon
4. Enjoy!

Granola!

granola

One of my friends made this for me a couple of years ago and shared the recipe. It’s been a while since I’ve made it because I would consume the batches way too quickly. This time around I’m trying to exercise some self-control which is not an easy feat. It’s such a simple recipe and can be adjusted to personal tastes as well as what mix-ins you have around the house. Sunflower seeds, diced dried apricots, and pistachios would work really well in this too. This morning, I made a parfait with blackberries and raspberries. For a snack or breakfast, I like to also have it in warm almond milk. It’s really soothing and satisfying 🙂

Ingredients:
2 1/2 cups regular oats (not instant)
1/2 cup roasted coconut chips
1 cup pumpkin seeds
½ cup dried blueberries or cranberries
1 teaspoon cinnamon
1/3 cup coconut oil
1/3 cup honey or agave nectar (vegan)
1 teaspoon vanilla extract

1. Preheat oven to 325 degrees.
2. Line a large sheet tray with parchment paper or a silpat.
3. Combine oats, coconut chips, pumpkin seeds, blueberries or cranberries, and cinnamon in a large bowl.
4. Combine honey or agave, coconut oil, and vanilla extract in a measuring cup.
5. Add oil mixture to oat mixture and combine well.
6. Spread on baking sheet in an uniform layer to allow for even baking.
7. Bake 20-25 minutes, stirring once halfway. Cool completely in pan, allowing the granola to crisp up and form clusters.
8. Store in airtight container.

Spicy Thai Carrot Ribbons!

spicy thai carrot ribbons

The creaminess of the peanut butter tames the heat of the crushed red pepper flakes in this yummy sauce for gently cooked carrot ribbons. No spiralizer needed! It could easily be bulked up into an entree with the addition of edamame or some crispy tofu over jasmine rice. Enjoy!

Serves 2

Ingredients:
1 tablespoon sesame oil
1 garlic clove, minced
¼ teaspoon crushed red pepper flakes
¾ cup vegetable broth
2 tablespooons creamy peanut butter
1 tablespoon soy sauce
1 teaspoon rice wine vinegar
2 medium size carrots
thai basil
toasted sesame seeds

Directions:
1. In a large skillet over medium heat, heat the sesame oil.
2. Add minced garlic and crushed red pepper flakes and cook just until fragrant, stirring constantly.
3. Add broth, peanut butter, soy sauce, and vinegar. Increase the heat to high and stir constantly until the peanut butter melts into the sauce.
4. Reduce the heat to medium-low and cook for about 5 minutes.
5. In the meantime, use a vegetable to first peel off the skin and discard. Then shave carrots into thin ribbons.
6. Add ribbons to the pan and cook for 2 minutes. Stir to coat thoroughly in sauce.
7. Serve warm and garnish with thai basil and toasted sesame seeds.

*Follow me on Instagram for more delicious photos!*


Summer Bean Salad with Fregola!

summer bean salad with fregola

Fregola is an oven-toasted Sardinian pasta, shaped like little pearls. A special pasta-making method, using bronze drawplates give it a rough, porous texture that captures sauces and dressings very well. If you can’t find fregola, you could substitute Israeli couscous. This shallot dressing is so delicious, as the shallots are cooked slowly in oil to bring out their natural sweetness. Be sure to mix in the dressing while the pasta is still warm, as it will be better absorbed. This is the perfect summer salad to bring to your next barbecue or potluck!

Ingredients:

Dressing:
2 large shallots, chopped
¼ cup avocado oil
1 tablespoon apple cider vinegar
2 tablespoons vegetable broth
1 teaspoon dijon mustard
1 teaspoon honey
¼ teaspoon salt

Salad:
1 cup fregola
½ pound green beans, trimmed and blanched
½ pound yellow wax beans, trimmed and blanched
½ cup cherry or grape tomatoes, halved
1 tablespoon chopped fresh basil
½ teaspoon salt

Directions:
1. For the dressing: Place the shallots and avocado oil in a small saucepan over low heat and cook gently until completely soft, about 15 minutes. Remove from heat and let cool to room temperature.
2. In a food processor, add the cooled shallots and oil, the apple cider vinegar, broth, mustard, honey, and salt. Pulse until the shallots are finely chopped and the dressing is thick. Set aside.
3. For the salad: Bring a medium pot of salted water to a boil over medium-high heat. Add the fregola and cook for 8-9 minutes or until cooked through. Drain well, then place in a large bowl. While the fregola is still warm, add the dressing and toss to coat. Allow the fregola to cool slightly before adding the green beans, wax beans, tomatoes, basil and salt; toss gently to coat.

fregola

Socca Flatbread!

socca flatbread

Socca originates from Provence, France and the neighboring region of Liguria, Italy. It is similar to a large pancake, but savory and naturally gluten-free. These can be topped with just about anything and are a great brunch idea. On this particular day, I was making them for breakfast, so I added an egg, ramps, arugula, and roasted tomatoes with a little balsamic drizzle. Be sure to add enough oil to the pan, so that the socca will get crispy. Enjoy!

Ingredients:
2 ¼ cups chickpea flour
2 tablespoons olive oil, plus more for cooking
Salt

1. Whisk together chickpea flour, olive oil, and 2 cups of water. Season with 2 big pinches of salt.
2. Heat an 8-inch nonstick pan over medium-high heat. Add 1-2 tablespoons of olive oil and when hot, add in about ¼ cup of the batter. Cook for 3-5 minutes, or until the bottom is crispy and the top is almost set. Carefully flip the socca and cook for another minute.
3. Transfer to plate and repeat with remaining batter.
4. Add desired toppings and serve.

Chickpea Pancake with Ramps!

chickpea pancake

It’s ramps season! I’m embarassed to say this is my very first time actually cooking ramps, but they are so delicious. Hence, the excitement over ramps season, which is only a few weeks during the spring. They are very limited in supply, as they grow very slowly, requiring up to four years to flower and reproduce. Ramps have a garlic and onion flavor, reminding me of Chinese chives. Get to your local farmer’s market before they’re gone! They really don’t need much, as they’re full of flavor, and complement the chickpea pancake perfectly. Simply saute the ramps in some olive oil and sprinkle with salt and pepper.

I had been meaning to try this pancake recipe over the last month. It’s supereasy and also very versatile. You can vary the different spices in the batter and/or top it with some whipped greek yogurt and lemon zest. The pancake is also superfilling and packs in 9 grams of protein per piece. This would be a perfect weekend brunch item 🙂

Ingredients:
4 large eggs
1/2 cup water
1/2 cup chickpea flour
1/2 teaspoon sea salt
1/2 teaspoon freshly ground black pepper
1/2 teaspoon baking powder
1/4 teaspoon ground spice, such as cumin, sweet paprika, curry powder or garam masala
1 tablespoon olive oil or avocado oil

Procedure
1. Whisk the eggs in a bowl until well blended, then whisk in the water, chickpea flour, salt, pepper, baking powder, and the spice of your choice, until well combined and lump-free. Or to guarantee a lump-free batter, place all ingredients in a blender.

2. Heat the oil in a small nonstick skillet over medium-low heat. Pour in the egg mixture; cook undisturbed for about 5 minutes. Once the underside is set and lightly browned but the top isn’t fully set, carefully flip the omelet. (It helps to use one of those large pancake spatulas).Cook for about 1 minute more; the omelet is done once the second side is set.

3. Cut into quarters and divide between plates. Enjoy!

Home-brewed Kombucha!

kombucha_ready to brew

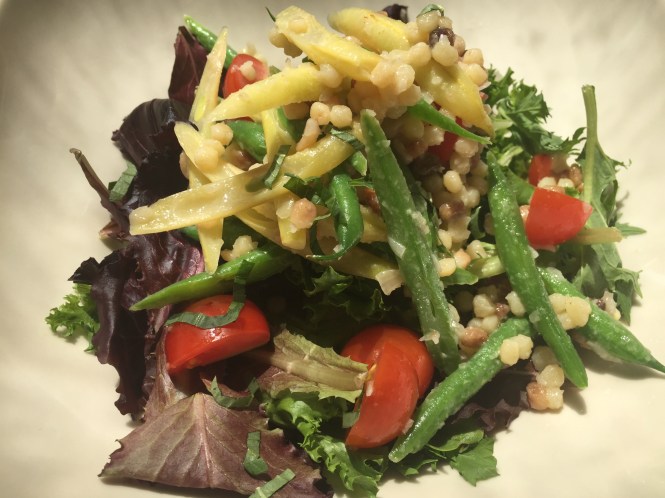
Like many other health foods, I was first introduced to kombucha while attending the Natural Gourmet Institute. We were learning about the benefits of living foods, including fresh/raw, sprouted, fermented, and dehydrated foods. Fermented foods were of particular interest to me when I learned that they introduce beneficial bacteria (probiotics) into your digestive system that have been shown to slow or reverse some diseases, aid digestion, and boost immunity. In order to nourish or feed the probiotics, it’s important to eat plenty of prebiotics, which are abundant in fruit and vegetables. Through Kombucha 101 class I also learned that it’s not just the probiotics that we benefit from, it’s also the seven different acids created through fermentation that are beneficial to the body. These acids help detoxify the body, balance a number of critical systems, and increase nutrient absorption, among other benefits. The microbes in kombucha transform the sugar and other compounds into highly accessible polyphenols and other antioxidants, B vitamins, vitamin C, organic enzymes, amino acids, and organic acids. Kombucha is a true superfood!

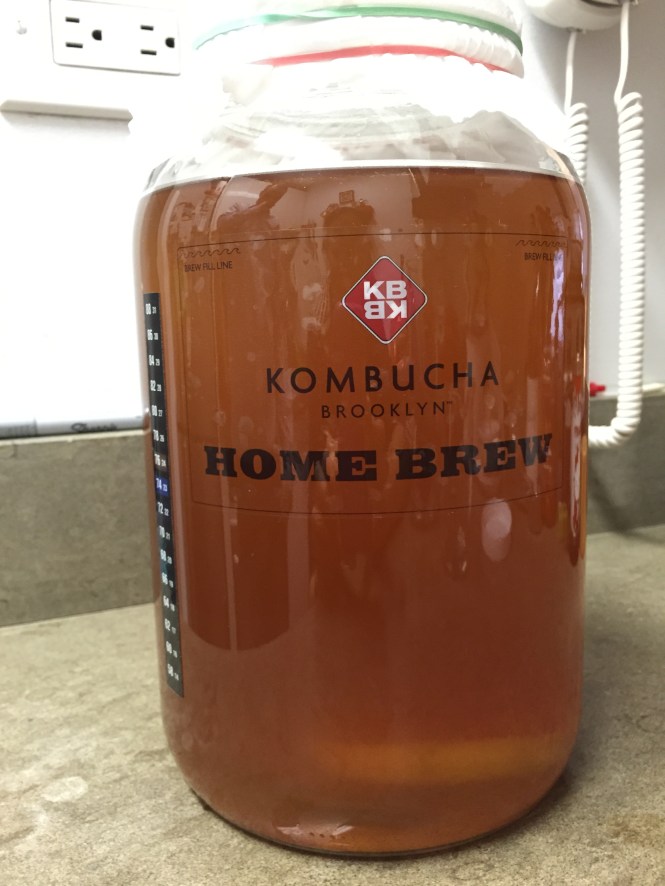
When I began to drink a bottle of kombucha on a daily basis, it started to get pricey at $4 or $5 a bottle, so the cost motivated me to learn how to make it myself. The SCOBY, symbiotic culture of bacteria and yeast, kind of freaked me out, but after taking the Kombucha 101 class at Kombucha Brooklyn (located in Kingston, NY), I realized that the scoby is a beautiful living thing. With each batch of kombucha, a new scoby is produced, so you can give them to friends or family to begin their own brews. It’s kind of an amazing process and I’m so happy that I’ve begun to make my own. Brewing kombucha is surprisingly easy! I found the Kombucha! book by Eric and Jessica Childs to be incredibly helpful. I purchased this kit to start: http://www.kombuchabrooklyn.com/kombucha-home-brewing-kits/kbbk-super-kit.html.

Once you start brewing, all you really need to buy are tea and sugar to continue the process. This recipe is adapted from Kombucha Brooklyn’s recipe with some of my additional notes. It takes you through the primary fermentation process. In order to carbonate your kombucha, secondary fermentation is necessary. You can also experiment with flavoring. I’ve only gone as far as putting some sliced ginger in bottles, which I enjoyed. The book provides more guidance on this process and also if you can make it to Kingston, NY, I really loved the Kombucha 101 class. It definitely made me feel more confident that I could successfully brew my own at home. They also offer more advanced classes for brewing kombucha which I may look into once I become a primary fermentation pro 🙂

Equipment:
1 gallon glass brew jar
Cloth cover and rubber bands
temperature strip
6 – 16 oz glass bottles

Ingredients:
SCOBY with starter liquid
1 cup organic evaporated cane sugar
12 oz. tea bag (black, white, and green tea blend)

Procedure:

1. Boil 4 cups of filtered water.
2. While the water is boiling, clean the brewing area, jar, hands and utensils and make sure the items are well-rinsed and free of soap residue.
3. Steep tea bag in hot water for 20 minutes, making sure to stir the tea every 5 minutes.
4. Remove tea bag and stir sugar until fully dissolved.
5. Add 2 quarts of cold filtered water to the gallon brew jar; add the sweetened tea. Stir.
6. Stick the temperature strip on the side of the brew jar and make sure the temperature is below 90 degrees before adding the scoby with its starter liquid (a temperature of 90 and above could kill the scoby)
7. Cover the jar with the cloth cover with 2 rubber bands (in case one breaks). Make sure the cover is pulled tightly over the rim of the jar to prevent contamination/fruit flies.
8. Keep the brew jar in a warm environment between 72 and 80 degrees, avoiding direct sunlight. If your home is not warm enough, you can buy a small heating mat to either wrap around or put under the jar, depending on how cool your home is.
9. Within 2-4 days, you should see a new scoby developing on the surface.
10. You should start tasting your kombucha by day 7 to see where it’s at and whether or not you want to continue fermenting. This is really a matter of personal preference. Also, remember that your kombucha will ferment faster at warmer temperatures. In order to taste, you can use a clean shot glass to gently push the scoby down and scoop a little from the surface.
11. Once your kombucha is to your taste, you’re ready to bottle. Remove the original and new scoby and 2 cups of kombucha to use for your next batches. If you don’t plan to make a new batch right away, place these in an airtight glass container in the refrigerator. The original and the new scoby can each be used to make their own batches.
12. For bottling, I used a funnel for my first batch and that was a little messy. For the second batch, I may invest in an auto siphon to avoid spillage. Place bottles in the fridge, unless you plan to continue into secondary fermentation.

scoby and starter

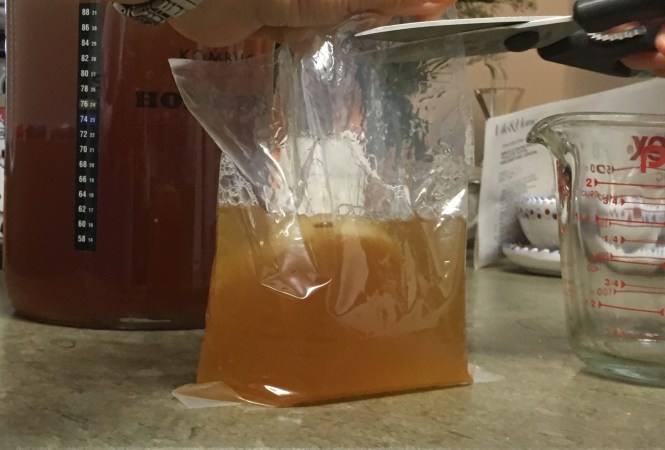
If you’re buying a scoby, it will come in a plastic bag with starter liquid.

new scoby_first batch

In my first batch of kombucha, the original scoby was vertical and the new scoby developed at the surface, as it should.

new scoby_second batch

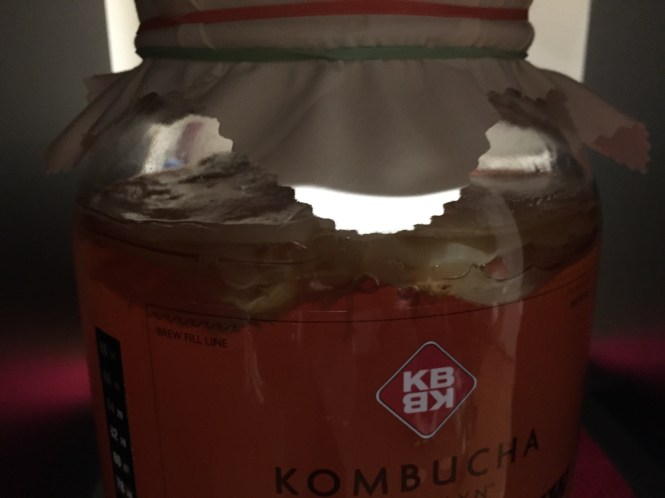
In my second batch, I used the new scoby that was created from the original. This new scoby sat at the top and another scoby is developing right on top.

new scoby

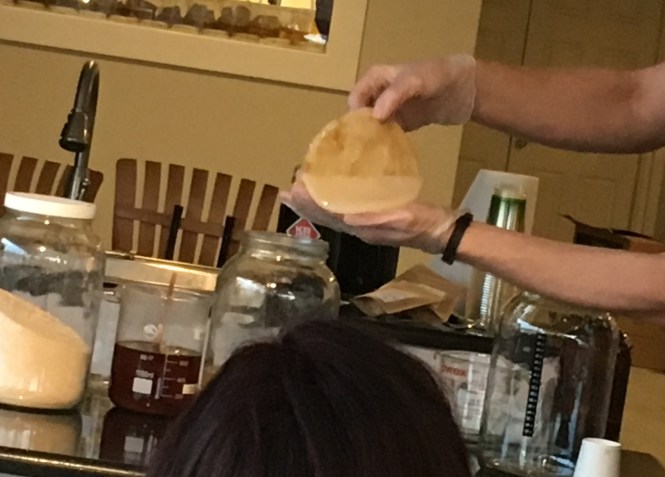
This is a photo from class: Eric Childs at Kombucha Brooklyn is removing his picture-perfect new scoby on top from the original one. Exciting stuff!

Happy brewing!!